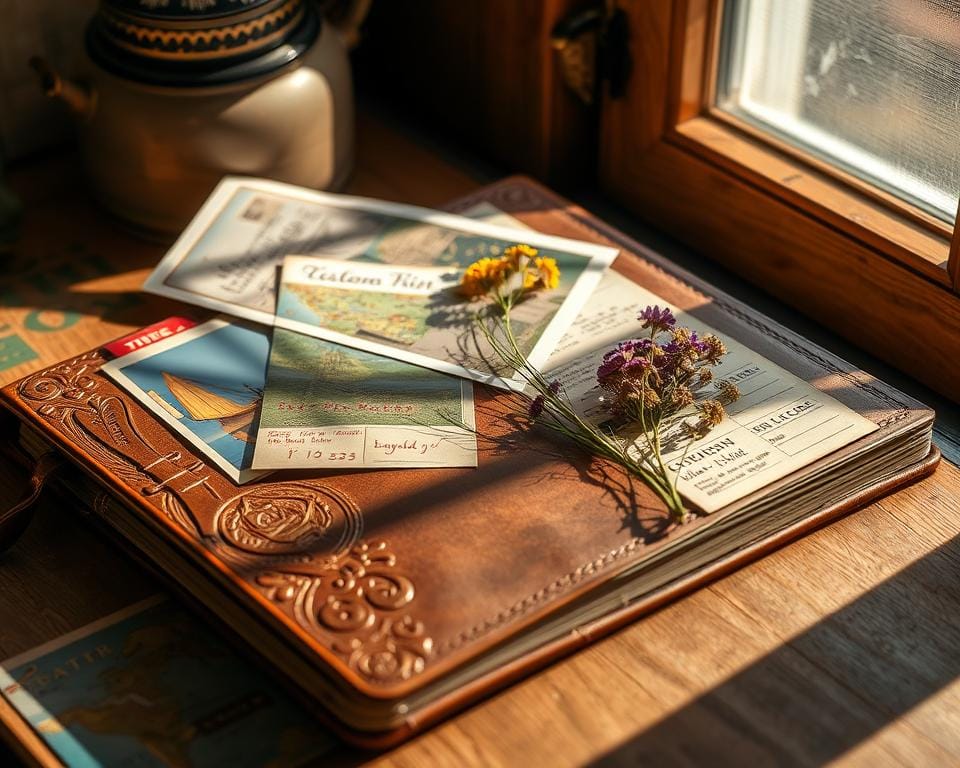
I still remember the first time I flipped through my grandmother’s old scrapbook. It wasn’t just a collection of photos; it was a vivid story of her adventures. Each page held a memory, a ticket stub, a pressed flower, and handwritten notes that brought her journey to life. That’s the magic of a travel scrapbook—it’s more than a photo album; it’s a keepsake that captures the essence of your experiences.
Over time, I’ve realised that memories fade, but a well-crafted scrapbook keeps them alive. Combining photos with mementos like maps, postcards, or even a leaf from a scenic hike adds depth to your story. It’s a creative way to relive your trip and share it with others.
If you’ve ever felt overwhelmed by the idea of starting one, don’t worry. This guide will walk you through practical tips and inspiring ideas to transform your travel memories into a beautiful narrative. Let’s dive in and make your journey unforgettable.
Key Takeaways
- A travel scrapbook preserves memories in a creative and lasting way.
- Combining photos with mementos enhances the storytelling experience.
- Practical tips make the process simple and enjoyable.
- Organising memories by themes or events adds structure to your scrapbook.
- Using decorative elements like stickers and washi tape personalises your pages.
Gathering Essential Tools and Materials
Gathering the right materials is the first step to crafting a meaningful travel scrapbook. Whether you’re a beginner or a seasoned scrapbooker, having the correct tools ensures your memories are preserved beautifully. From paper to adhesives, every item plays a role in bringing your journey to life.
Choosing the Right Paper and Adhesives
Start with acid-free paper. It’s essential for preserving your photos and mementos over time. Acid-free adhesives are equally important, as they prevent yellowing and deterioration. I always keep a variety of tapes and glues on hand, including double-sided tape for a clean finish.
Scissors, markers, and a ruler are must-haves. They help trim photos, add handwritten notes, and ensure everything is aligned perfectly. A well-organised workspace makes the process smoother, so I recommend keeping all your supplies in one place.
Selecting Photographs and Memorabilia
Your scrapbook is a visual story, so choose photos that capture the essence of your trip. I like to include a mix of landscapes, candid shots, and group photos. Don’t forget to add ticket stubs, maps, and postcards—they add depth and context to your pages.
Organising your materials beforehand saves time. I group items by theme or event, making it easier to create cohesive layouts. High-quality materials not only protect your memories but also make your scrapbook a joy to revisit.
Inspiring Design and Layout Options
Designing a scrapbook can feel daunting, but it’s all about finding your creative flow. The key is to start simple and let your ideas evolve. A well-thought-out layout can transform your memories into a visual masterpiece.
Simple Templates and Repetitive Designs
Using templates is a great way to maintain consistency. Repetitive design elements, like borders or headings, create a cohesive look. I often rely on online tools like Mixbook for inspiration. They offer easy-to-adapt templates that save time and effort.
Sticking to a consistent style and color palette ties your scrapbook together. For example, using earthy tones for a nature-themed journey adds harmony. Simple doesn’t mean boring—it ensures your pages are neat and visually appealing.
Creative Layout Ideas for Your Pages
Each page of your scrapbook can tell its own story. Experiment with different layouts, like grids or collages, to highlight your photos and mementos. I love mixing decorative elements, such as stickers and washi tape, with practical planning.
Adapting templates to suit different segments of your journey keeps things fresh. For instance, a timeline layout works well for chronological events, while a thematic approach suits specific experiences. Don’t be afraid to let your creativity shine while keeping the overall design tidy.
How to Create a Travel Scrapbook
There’s something magical about blending photos, tickets, and notes into a cohesive narrative. It’s not just about preserving memories; it’s about crafting a visual story that transports you back to the adventure. Here’s how I bring my pages to life with a mix of elements and creativity.
Mixing Photos with Ticket Stubs and Journals
Start by selecting your favourite photos from the trip. I like to include a mix of landscapes, candid shots, and group pictures. Next, add tangible tokens like ticket stubs, maps, or postcards. These small items add depth and context to your scrapbook.
Handwritten notes or extracts from your journal are a great way to personalise the pages. I often jot down funny anecdotes or reflections to accompany the visuals. This combination of images and words creates a mini narrative for each page.
Blending Colours and Textures for a Unique Look
Experiment with different colours and textures to make your scrapbook stand out. I use washi tape, fabric scraps, or even pressed flowers to add tactile interest. A consistent color palette ties the pages together, while varied textures keep them visually engaging.
Balance is key. Too many elements can overwhelm the page, so I stick to a few focal points. For example, a bold photo paired with subtle textures creates a harmonious look. Don’t be afraid to play around until you find the right mix.
Here are a few tips to keep in mind:
- Use acid-free adhesives to protect your memory tokens.
- Arrange items before sticking them down to ensure a balanced layout.
- Incorporate personal touches like handwritten notes or sketches.
- Let each page tell its own story while maintaining an overall theme.
Creating a travel scrapbook is all about celebrating your journey. With a bit of creativity and planning, you can turn your trip into a lasting keepsake.
Personalisation Tips to Make It Uniquely Yours
Adding a personal touch to your scrapbook transforms it from a simple album into a cherished keepsake. It’s about infusing your personality into every page, making it a true reflection of your journey. Here are some ways to make your travel scrapbook uniquely yours.
Incorporating Journaling and Anecdotes
Your journal is a treasure trove of memories. Include short captions, funny anecdotes, or heartfelt reflections alongside your photos. These personal notes add depth and context, turning each page into a mini story.
Don’t worry about perfect handwriting or polished prose. The charm lies in the authenticity of your words. A quick note about a hilarious mishap or a serene moment can bring your trip back to life.

DIY Embellishments and Interactive Elements
Get creative with DIY embellishments. Use washi tape, fabric scraps, or even pressed flowers to add texture and interest. These small details make your scrapbook visually engaging and uniquely yours.
Interactive elements like fold-out pockets or mini-books can make your album more engaging. They allow you to include extra memories, such as postcards or maps, without cluttering the page.
Here are a few tips to balance decorative flair with practicality:
- Stick to a consistent colour palette for a cohesive look.
- Arrange items before sticking them down to ensure a balanced layout.
- Mix textures and combine stickers or stamps for a playful touch.
Customising your travel scrapbook is not just about creativity; it’s about making something that sparks joy every time you revisit it. Let your personality shine through and enjoy the process!
Organising Your Memories for a Cohesive Album
Organising your travel memories can transform a simple album into a vivid story of your adventures. A well-structured scrapbook not only preserves your journey but also makes it easy to revisit. Whether you prefer a chronological or thematic approach, the key is to create a flow that feels natural and engaging.
Choosing Chronological or Thematic Structures
Deciding between a chronological or thematic structure depends on your trip and personal preference. A chronological layout works well if you want to document your journey day by day. It’s perfect for capturing the progression of your adventures, from the first destination to the last.
On the other hand, a thematic approach lets you group memories by experiences or locations. For example, you could dedicate a page to food, another to landscapes, and a third to cultural highlights. This method allows you to focus on specific aspects of your travel, making the album more dynamic.
Using Title Pages and Maps as Story Guides
Title pages and maps are excellent tools for guiding your story. A title page sets the tone for each section, whether it’s a new day or a specific theme. I like to include a short description or a quote that captures the essence of that part of my trip.
Maps are particularly useful for visualising your journey. They provide a clear overview of the places you’ve visited, adding context to your photos and mementos. You can even mark your route or highlight key locations to make the album more interactive.
Here are a few tips to keep your scrapbook organised:
- Use a consistent layout for each page to maintain harmony.
- Allocate space for both photos and written notes to balance visuals and storytelling.
- Annotate key dates and locations to enhance the narrative.
By organising your travel scrapbook thoughtfully, you’ll create a keepsake that’s both beautiful and easy to navigate. Let your memory of the journey guide your structure, and enjoy the process of bringing your adventures to life.
Preserving Your Scrapbook for Long-Lasting Memories
Preserving your travel scrapbook ensures your memories remain vivid for years to come. It’s not just about creating a beautiful album; it’s about safeguarding the stories and moments that make your journey special. With the right techniques, your scrapbook can withstand time, becoming a cherished heirloom.

Utilising Acid-Free Supplies and Protective Storage
Using acid-free paper and adhesives is essential for long-term preservation. These materials prevent yellowing and deterioration, keeping your photos and mementos intact. I always opt for acid-free tape and glue to ensure my scrapbook stays vibrant.
Storage conditions also play a crucial role. Keep your scrapbook in a cool, dry place, away from direct sunlight. Humidity and heat can damage the paper and adhesives, so I store mine in a protective box or on a shelf with minimal exposure to light.
Here are a few tips to maintain your scrapbook:
- Handle with clean hands to avoid transferring oils or dirt.
- Dust the pages regularly to prevent buildup.
- Use archival-quality sleeves for extra protection.
Exploring Digital Backup Options
For added security, consider digital backups. Platforms like Mixbook allow you to create a digital version of your scrapbook, ensuring your memories are safe even if the physical copy is damaged. I’ve found this particularly useful for sharing my travel stories with friends and family.
Digital backups also offer flexibility. You can easily edit, update, or print additional copies without altering the original. It’s a modern solution that complements traditional scrapbooking beautifully.
Here’s how I integrate digital backups into my process:
- Scan or photograph each page for high-quality digital copies.
- Organise files by holiday or theme for easy access.
- Share digital versions with loved ones who live far away.
By combining traditional methods with digital solutions, you can ensure your travel scrapbook remains a lasting tribute to your adventures.
Bringing Your Travel Scrapbook Journey to a Close
Every trip leaves a mark, and a scrapbook is the perfect way to keep those moments alive. From gathering supplies to adding personal touches, each step transforms your memory into a tangible story. Whether it’s a ticket stub, a photo, or a handwritten note, these elements breathe life into your journey.
Creating a travel scrapbook is more than an art; it’s a personal memoir. It’s about celebrating the small details that make your adventures unique. Use acid-free materials to preserve your pages, and don’t shy away from adding DIY embellishments. These little touches make your scrapbook truly yours.
Here’s an idea: start small. Dedicate a page to your favourite moment from your last trip. Let it inspire you to document more. Every memory, no matter how fleeting, deserves to be cherished. Keep crafting, keep documenting, and let your travel scrapbook tell your story for years to come.
FAQ
What tools do I need to start a travel scrapbook?
I recommend gathering essentials like acid-free paper, adhesive tape, scissors, and embellishments. A good-quality album or binder is also a must to keep everything organised.
How do I choose the right photos and memorabilia?
I pick photos that tell a story, like landscapes or candid moments. I also include ticket stubs, maps, and small souvenirs to add texture and depth to my pages.
Are there any simple design templates I can use?
Yes! I often use repetitive designs like grids or borders to keep my layout clean. Templates from brands like Project Life or Etsy are great for beginners.
How can I make my scrapbook more personal?
I add journaling to share my thoughts and anecdotes. DIY embellishments, like hand-drawn doodles or pressed flowers, also make it uniquely mine.
Should I organise my scrapbook chronologically or thematically?
It depends on my preference. I’ve done both! Chronological works for trips with a clear timeline, while thematic is perfect for grouping similar experiences.
How do I preserve my scrapbook for years to come?
I use acid-free supplies to prevent yellowing and store it in a cool, dry place. For extra safety, I sometimes digitise my pages as a backup.
Can I include interactive elements in my scrapbook?
Absolutely! I love adding pockets for extra photos, fold-out maps, or even QR codes linked to videos. It makes the experience more engaging.
What’s the best way to blend colours and textures?
I experiment with patterned paper, washi tape, and fabric scraps. Sticking to a cohesive colour palette helps maintain a polished look.